[vc_row][vc_column][vc_column_text]
Easy Steps To Create Lightroom Presets
In previous article I covered Lightroom Presets and how they can speed up our post processing. In this tutorial I am going to show you easy steps to create Lightroom Presets according to your taste or style of photography.
Presets are basically certain adjustments which will be applied to images by clicking only one button. Lightroom is shipped with lots of default Presets, but you may or may not like all of them.
There are tons of third party presets available, some even free, that you can install and use them, but in most cases they may not represent your photography or branding style.
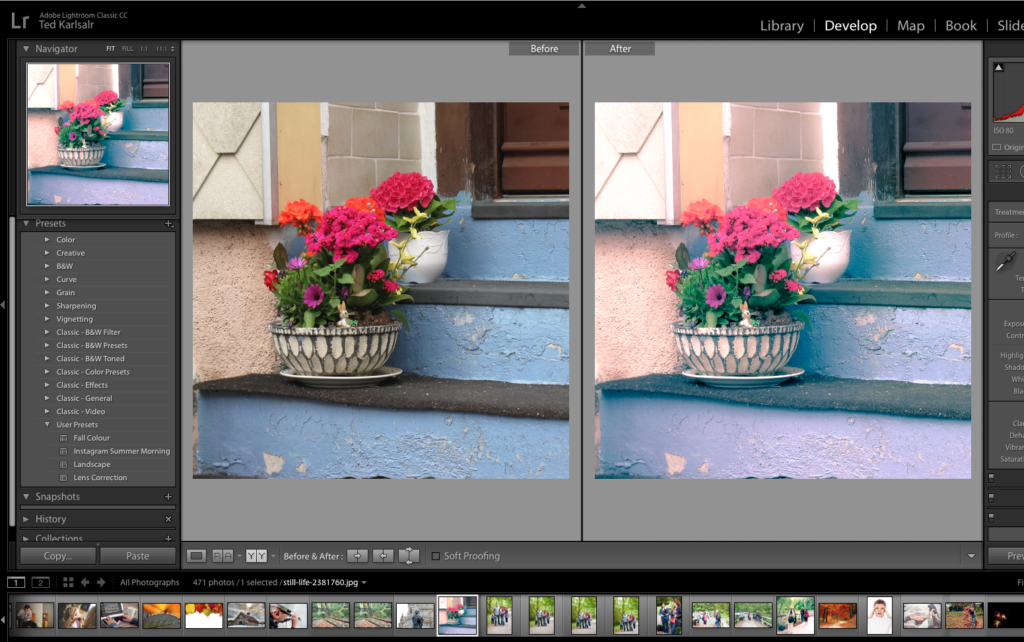
So get ready to create your very first Lightroom Preset![/vc_column_text][/vc_column][/vc_row][vc_row parallax=”content-moving” parallax_speed_bg=”3″ css=”.vc_custom_1531262775274{background-image: url(https://omnilargess.com/wp-content/uploads/2018/07/Screen-Shot-2018-07-10-at-3.26.06-PM.png?id=21188) !important;}”][vc_column][vc_custom_heading text=”How to Create Lightroom Presets” font_container=”tag:h2|font_size:45|text_align:center|color:%23ffffff|line_height:3″ use_theme_fonts=”yes” css_animation=”fadeIn”][/vc_column][/vc_row][vc_row][vc_column][vc_column_text]Generally speaking, you make presets for universal adjustments, which means some of the adjustments are different for each photos, such as Exposure and White Balance. Having said that, in this example I am going to create a preset for Instagram.
As you know Instagram likes square photos, so cropping the photo to 1X1 (square format) is not part of this preset. So you need to crop the photos later.
Creating Instagram “Summer Morning Preset”:
In Lightroom go to Develop module and start editing one photo. I cropped the image to 1X1, adjust the Highlights and Shadows, increased the Whites to represent the brightness and contrast of a Summer Morning.[/vc_column_text][vc_single_image image=”21196″ img_size=”600×400″ add_caption=”yes” alignment=”center” style=”vc_box_rounded” onclick=”link_image” css_animation=”slideInRight” title=”Easy Steps to Create Lightroom Presets”][vc_column_text]For this preset, I want to add more warmth to the Highlights and cooler tone for the Shadows. So I adjusted them under the SPLIT TONE adjustment. SPLIT TONE allows you to set different tones for shadow and highlight.[/vc_column_text][vc_single_image image=”21197″ img_size=”600×400″ add_caption=”yes” alignment=”center” style=”vc_box_rounded” onclick=”link_image” css_animation=”slideInRight” title=”Split Tone Adjustment”][vc_column_text]Next I used the Radial Filter (one of Lightroom’s Hidden Gems) to add an effect to the edges of the photo[/vc_column_text][vc_single_image image=”21198″ img_size=”600×400″ add_caption=”yes” alignment=”center” style=”vc_box_rounded” onclick=”link_image” css_animation=”slideInRight” title=”Using Radial Filter”][vc_column_text]Then I compared the Before and After to make sure that I like the adjustments.[/vc_column_text][vc_single_image image=”21199″ img_size=”600×400″ add_caption=”yes” alignment=”center” style=”vc_box_rounded” onclick=”link_image” css_animation=”slideInRight” title=”Before and After”][vc_column_text]I liked the effect, then I clicked on the “+” right on the preset tab. I named the preset as “Instagram Summer Morning”, marked all the adjustments that I wanted to be recorded, and saved it under “User Presets”.[/vc_column_text][vc_single_image image=”21200″ img_size=”600×400″ add_caption=”yes” alignment=”center” style=”vc_box_rounded” onclick=”link_image” css_animation=”slideInRight” title=”Saving the Preset”][vc_column_text]I can find the new preset under User Presets tab.[/vc_column_text][vc_single_image image=”21201″ img_size=”600×600″ add_caption=”yes” alignment=”center” style=”vc_box_rounded” onclick=”link_image” css_animation=”slideInRight” title=”Users Preset Tab”][vc_column_text]Now that I have saved the preset I can apply these custom adjustment to any photographs just by clicking on it.[/vc_column_text][vc_single_image image=”21202″ img_size=”600×400″ add_caption=”yes” alignment=”center” style=”vc_box_rounded” onclick=”link_image” css_animation=”slideInRight” title=”Applying Preset”][vc_single_image image=”21203″ img_size=”600×400″ add_caption=”yes” alignment=”center” style=”vc_box_rounded” onclick=”link_image” css_animation=”slideInRight” title=”Applying Preset”][/vc_column][/vc_row][vc_row][vc_column][vc_cta h2=”Omnilargess Photography Classes” h4=”Registration Page” txt_align=”center” style=”outline” color=”black” add_button=”bottom” btn_title=”Find your workshop” btn_style=”outline” btn_color=”turquoise” btn_size=”lg” btn_align=”center” btn_i_type=”typicons” btn_i_icon_typicons=”typcn typcn-camera-outline” btn_css_animation=”bounceInDown” add_icon=”top” i_icon_fontawesome=”fa fa-graduation-cap” i_color=”black” i_background_style=”rounded” i_size=”xl” i_css_animation=”flipInY” css_animation=”fadeIn” btn_add_icon=”true” i_on_border=”true” btn_link=”url:http%3A%2F%2Fwww.omnilargess.com%2Fevents||target:%20_blank|”]You can start to create your own Lightroom presets which match your style. As Lightroom is non destructive, your original image is always safe. Go ahead and create as many presets as you like. The sky’s the limit!
That is all for now. We love to hear from you. Let us know if you have used Lightroom Presets.Please send your questions to us and we will be more than happy to answer them. Follow us on Facebook, Instagram and Twitter for more Free Tutorials and Tips.
Ted and the Omnilargess Team
Our next Lightroom Training Program is scheduled for November 7th, 2018. It is a three session workshop with lots of hands on and practical examples to help you start using Lightroom power.

