7 Must-Know Exposure Techniques for Better Photography
Master Your Exposure Techniques and Camera Settings to Get Stunning Results—Even as a Beginner!
Exposure is the heart of photography. It determines how light or dark your image appears and sets the mood of your photo. Whether you’re capturing a golden sunset or a fast-moving subject, knowing how to control exposure is essential to telling your story through the lens.
If you’re just starting out, exposure might seem intimidating. But once you understand the tools and techniques, it becomes second nature—and that’s exactly what we teach in our Omnilargess Beginner Photography Bootcamp.
In this post, I’ll break down 7 essential exposure techniques, complete with real-life examples and tips you can practice right away.
1. Understand the Exposure Triangle
Tip: Learn to balance ISO, shutter speed, and aperture.
The Exposure Triangle is the foundation of every well-exposed image. It includes:
- ISO (sensitivity to light)
- Shutter Speed (how long the shutter stays open)
- Aperture (the size of the lens opening)
Example:
You’re photographing your child blowing out birthday candles in a dimly lit room. You may need to raise the ISO to 800 or 1600, use a slower shutter speed (like 1/60s), and a wide aperture (like f/2.8) to get a bright, sharp image.
At our Beginner Bootcamp, we simplify this triangle with hands-on practice so it actually clicks (pun intended!).
2. Use Exposure Compensation
Tip: Fine-tune your exposure without switching to full manual.
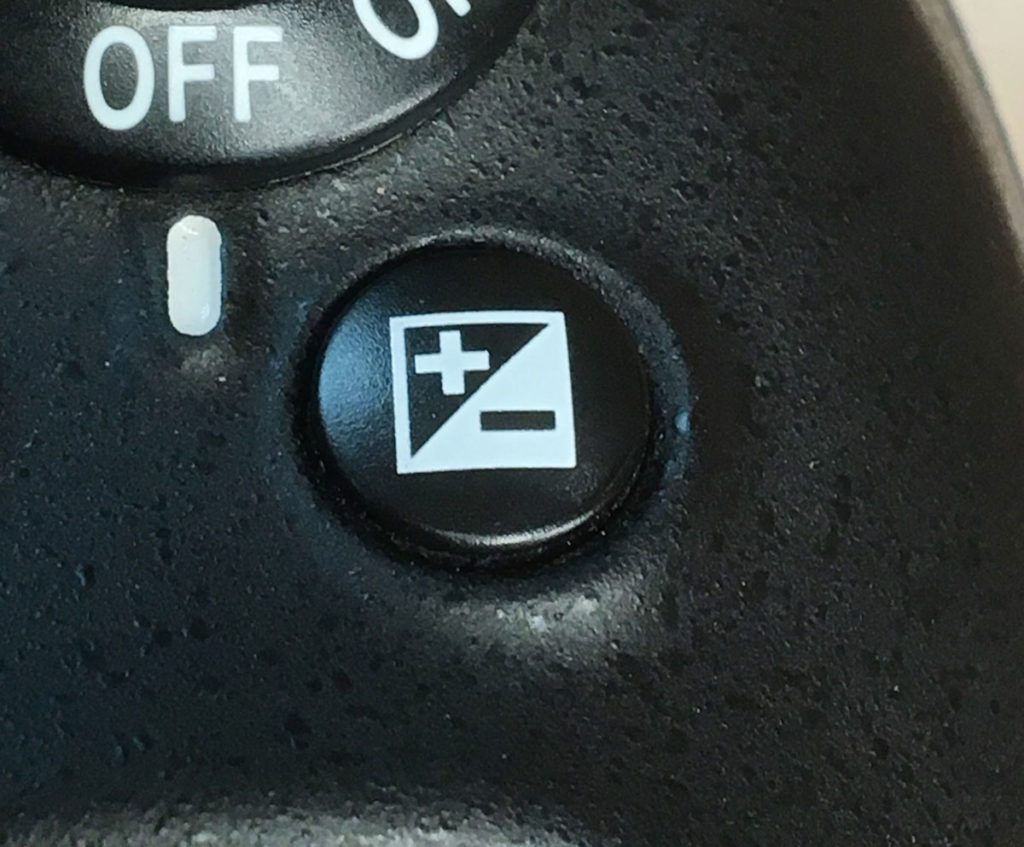
Most cameras have a handy feature called Exposure Compensation (+/- button). It lets you brighten or darken your photo while shooting in semi-automatic modes like Aperture or Shutter Priority.
Example:
When shooting a snowy landscape, your camera might underexpose the scene. By dialing in +1 or +2 stops of exposure compensation, you can keep the snow looking white rather than dull gray.
We teach how to use this feature confidently during our outdoor sessions in the bootcamp.
3. Meter for the Right Part of the Scene
Tip: Don’t let your camera guess what’s important—tell it!
Modern cameras offer different metering modes (Evaluative, Spot, Center-weighted). Choosing the right one ensures your subject is properly exposed.
Example:
When photographing a backlit portrait, using spot metering on the face helps expose for your subject correctly, instead of the bright background.
This is a favorite trick we cover in our field trips, especially when working with high-contrast scenes in natural light.
4. Use Histograms, Not Just the LCD
Tip: Trust the data, not just your eyes.
Your camera’s LCD can be deceiving, especially under bright sun. Instead, check the histogram to see if your image is overexposed (clipped highlights) or underexposed (lost shadows).
Example:
Shooting a sunrise? If the right side of your histogram is spiked and cut off, you’re losing highlight details in the sky. Dial back your exposure slightly to preserve the beautiful colors.
We train our students to read histograms during every shoot so they stop guessing and start knowing.
5. Control Highlights and Shadows with Manual Mode
Tip: Manual Mode isn’t scary—it’s liberating.
Manual mode lets you control all aspects of exposure. You get to decide what’s more important—shutter speed, aperture, or ISO—depending on your subject.
Example:
Shooting waterfalls? You can lower your shutter speed (1/4s or 1/8s), narrow your aperture (f/11), and use a low ISO (100) to get that silky water effect, even if it means using a tripod.
Our bootcamp guides you through Manual Mode with step-by-step instruction—no prior experience required.
6. Use Bracketing for Difficult Lighting
Tip: Capture multiple exposures, pick the best—or blend them.
Exposure bracketing is when your camera takes several photos at different exposures (e.g., one normal, one underexposed, one overexposed). This is especially helpful in tricky lighting situations.
Example:
Imagine photographing inside a church—dark interior and bright stained-glass windows. Use bracketing to preserve details in both shadows and highlights, then blend in post-processing.
This advanced technique is simplified and practiced during our bootcamp sessions so you gain confidence fast.
7. Use ND Filters for Creative Control
Tip: Shoot long exposures in daylight without overexposing.
Neutral Density (ND) filters reduce the amount of light entering your lens. This lets you use slower shutter speeds or wider apertures even in bright conditions.
Example:
Want to blur motion on a busy street or a flowing river at noon? An ND filter allows longer shutter speeds without blowing out the image.
We demo these filters in our outdoor classes so you can see the magic in action.
Want Hands-On Practice? Join Our Photography Bootcamp!
These tips are powerful, but practice makes progress. That’s why our Omnilargess Beginner Photography Bootcamp is designed to help you master exposure through real-life shooting experiences.
What’s Included:
- 4 In-Class Sessions
- 2 Field Trips (Practice in Natural Light!)
- Small Class Sizes for Personalized Attention
- Suitable for DSLR, Mirrorless, and Even Advanced Compact Cameras
Upcoming Dates: Saturday mornings
Location: Fraser Valley, Abbotsford area
Level: Complete beginners to hobbyists ready to move beyond Auto Mode
Spots are limited
Final Thought:
Exposure is your camera’s language, and once you learn to speak it fluently, your creative freedom multiplies. So don’t stay stuck in Auto Mode—take control, and let your photos reflect your true vision.
We hope to see you in our next Beginner Photography Bootcamp. Let’s capture something beautiful together!
Want More Free Photography Tips?
Follow us on Instagram and Facebook for daily photography tips and tutorials.

That is all for now. Stay tuned for my following photography Tips. We love to hear from you. Let us know if you have any questions; feel free to send us your questions, and we will gladly answer them. Follow us on Facebook, Instagram and Twitter for more Free Tutorials and Tips.
Ted and the Omnilargess Team


