Mastering the Exposure Triangle: A Practical Guide for Better Photos
If you’re starting out in photography or even brushing up on the basics, you’ve probably heard the term Exposure Triangle tossed around quite a bit. But what is it really? More importantly, how do you use it effectively in real-world shooting situations?
In this blog post, we’ll break down the exposure triangle into simple terms and give you real-life examples so you can confidently take control of your camera—and your creativity.
What is the Exposure Triangle?
The Exposure Triangle is made up of three camera settings that work together to control the brightness (exposure) of your photo:
- Aperture (f-stop): Controls how much light enters through the lens.
- Shutter Speed: Determines how long the sensor is exposed to light.
- ISO: Adjusts the sensor’s sensitivity to light.
Imagine each of these settings as one side of a triangle. Change one, and you usually need to adjust the others to maintain proper exposure.
Why It Matters
Using Auto mode might get you acceptable results sometimes, but understanding how the triangle works puts you in control. Whether you’re photographing a moving subject, a dimly lit scene, or trying to create artistic effects like background blur (bokeh), knowing how to balance aperture, shutter speed, and ISO makes all the difference.
Real-Life Example #1: Portrait Photography
Scenario: You’re photographing a friend outdoors in soft afternoon light.
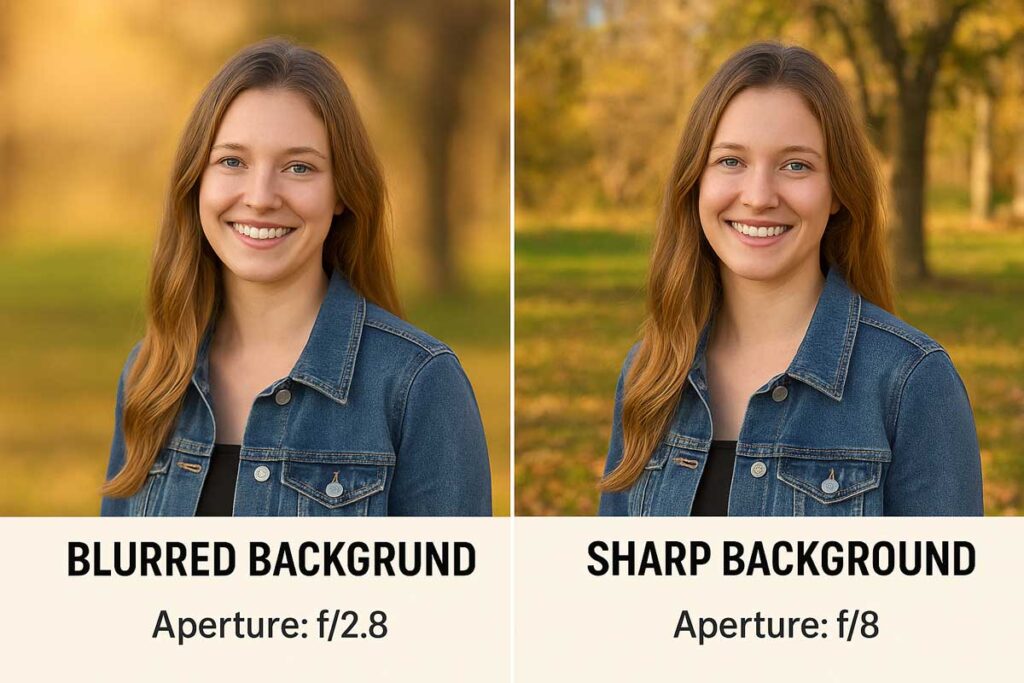
Your goal: Blur the background to make your subject stand out (shallow depth of field).
Step-by-Step:
- Aperture: Choose a wide aperture (e.g., f/2.8).
- Shutter Speed: The wide aperture lets in a lot of light, so you’ll need a faster shutter speed to avoid overexposure—maybe 1/1000 sec.
- ISO: Set ISO to 100 or 200 to keep the image clean and noise-free.
Result: Your subject is tack sharp, and the background melts into a soft blur. Beautiful!
Real-Life Example #2: Action Photography (Sports or Kids Playing)
Scenario: You’re shooting your child playing soccer.
Your goal: Freeze motion to capture sharp action shots.
Step-by-Step:
- Shutter Speed: Start with a fast shutter speed—1/1000 sec or higher.
- Aperture: Set a moderately wide aperture (e.g., f/4 or f/5.6) to allow enough light in.
- ISO: If it’s cloudy or the light is low, increase ISO to 400 or 800 to maintain proper exposure.
Result: You get crisp shots of your child mid-kick with no motion blur.
Real-Life Example #3: Low Light or Night Photography
Scenario: You’re taking photos during golden hour or after sunset without a flash.
Your goal: Get a bright enough photo without using artificial light.
Step-by-Step:
- Aperture: Use the widest available (e.g., f/1.8 or f/2.8) to let in more light.
- Shutter Speed: Go slower (e.g., 1/60 sec or even 1/30), but remember that slower speeds may require a tripod to avoid blur.
- ISO: Raise the ISO to 800, 1600, or even higher, depending on your camera’s low-light capabilities.
Result: You capture the mood of the scene, balancing ambient light with exposure—yes, with a bit of noise, but worth it!
Pro Tips for Using the Exposure Triangle
- Always prioritize your creative intent—motion blur, depth of field, etc.—then adjust the other two settings to compensate.
- Use your camera’s light meter or histogram to check exposure in real-time.
- Practice in Manual or Aperture Priority mode to gradually gain confidence.
- Don’t fear ISO—modern cameras handle higher ISO values quite well, especially in RAW.
Learn It Hands-On With Us
At Omnilargess Photography Classes, we believe that understanding exposure is the first major step to mastering your camera. That’s why our Beginner Photography Bootcamp and Outdoor Workshops include hands-on exercises dedicated to practicing the Exposure Triangle in different lighting conditions.
Want to see your photos go from “meh” to magical? Join us in the field—literally—and discover how empowering manual shooting can be.
Final Thoughts
The Exposure Triangle isn’t just theory—it’s your toolkit for telling better visual stories. Whether you’re after that dreamy background blur, sharp sports action, or moody nighttime shot, it all comes down to how you balance aperture, shutter speed, and ISO.
So grab your camera, experiment, and see what magic you can create!
Want More Free Photography Tips?
Follow us on Instagram and Facebook for daily photography tips and tutorials.

That is all for now. Stay tuned for my following photography Tips. We love to hear from you. Let us know if you have any questions; feel free to send us your questions, and we will gladly answer them. Follow us on Facebook, Instagram and Twitter for more Free Tutorials and Tips.
Ted and the Omnilargess Team


